Introduce how to draw the character that looks up from the bottom and perspective. This is a quick and easy way to write something that looks more like the accuracy of a photo.
Tips
It ’s difficult to draw a clear perspective, and since there are few scenes and situations that can be used in the first place, the basic tips is “write as little as possible”.
Difficulty
It ’s difficult to draw the underside of your chin when you draw a character with a tilt perspective. When the elevation angle is tight, the hair is almost invisible and the shape is distorted, making it difficult to draw. It is also difficult to balance because the lower body is larger and the upper body is clogged.
How to draw the head
This section introduces how to draw the head, which has the most chance to use from the perspective.
For the basic policy on how to write around the head, use the procedure of “How to make a contact with a cube” in this article.
Example 1
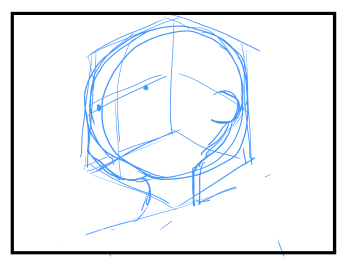
Take a hit with a cube seen from below.

Extend the face that will be the face. Add auxiliary lines such as center lines as necessary.

Take a circle around the back of the head with a sphere that fits in the cube.

Take around the face. Align the tip of the chin to the bottom position of the face around the face. Place the ears around. Make sure that the top edge of the ear is at the center of the side.

Take around the eyes, nose and mouth.


The solid line is taken out and completed.

Example 2
Write the tilt from a more angled position.
Draw a diagram of the cube looking up from below.

Stretch the lower side of the face that will be the face. Add a center line if necessary.

Take the back of the head with a sphere that fits in a cube. Make sure that the bottom of the chin is at the bottom of the face. Place the ears around. Position it so that the top of the ear is at the center of the side.

Take around the eyes, nose and mouth.

Draw a solid line to complete.


If the carving is deep, you may draw a chin line. It seems more natural not to write the lines on the back of the chin.

How to draw the head (Simple version, for deformed pattern)
Example 1
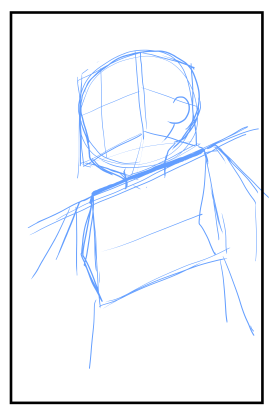
Take a cube around the head. This time around the figure below. View from below.

Write a sphere that fits perfectly in the surrounding cube. Estimate the eye position.

Draw chin and cheeks so that they protrude from the bottom of the cube. Because my cheeks swell, I put them out a little outside. The cheek-chin line can be changed according to your preference. Take the position of the ear and the neck.
Take around the upper body that leads to the neck. See also this article for details on how to write the upper body.

Draw contour lines and complete. The chin line from the chin to the back of the ear was not drawn because it was difficult to draw.

Example 2
I will write it from a different angle. The following is the area around the cube.

Draw around the same procedure as before.

Draw around the same procedure as before.

Reference
Sometimes the chin line and the neck line are drawn.

If the elevation angle of the tilt is shallow, the chin-cheek line may be drawn.
Since the upper body is a little small, it is completed and corrected.

The occipital region may look a little unnatural, but in the actual picture, it may be hidden by the hair, so it may not be necessary to be so nervous.
How to write
Take around the upper and lower body. Please refer to this and this article for how to get around. Please note that the foot side in front is larger in the case of a tilting composition.

When drawing from a low-pointed viewpoint, you can see the underside of the chin and the underside of the crotch (the area enclosed in pink in the figure below). If there is no material and you have drawn it in your imagination, you may forget to write this part and become unnatural. Also, because it is a place that is not usually drawn, it is difficult to draw this part.

Draw a body line with reference to the line around the body.

Draw an outline to complete.

Example when the elevation angle is shallow
Take around the head. Note that the elevation is shallow, but increases toward the lower body.

Take the area around the body with reference to the area around the head. Please refer to this article for how to take the upper body.
Draw a body line with reference to the surrounding lines.

Finally, the outline is taken out and completed.

Supplement (when deforming)
This is an example of deforming a character.
Take around the head and body. Try to write the upper body behind the head and the lower body behind the upper body.

Write the body lines with reference to the surrounding lines.

Complete the outline.

Although slightly emphasized, it shows the positional relationship between the head, upper body, and lower body. It is easier to balance if you place the upper body behind the head and the lower body further behind the upper body. In order to balance the whole, the tip of the foot comes out big forward.

I want to write more precisely and precisely
For more realistic and realistic drawing, the following books are helpful.
Cre: ipentec/ あおり


No comments